SpringCloud OpenFeign
利用RestTemplate发起远程调用代码如下:
//url
String url = "http://user-service:8081/user/" + order.getUserId();
//发起调用
User user = restTemplate.getForObject(url,User.class);
此时代码可读性差,参数复杂 URL 难以维护。
而 Feign 是一个声明式的http客户端,其作用就是帮助我们优雅的实现 http 请求的发送。
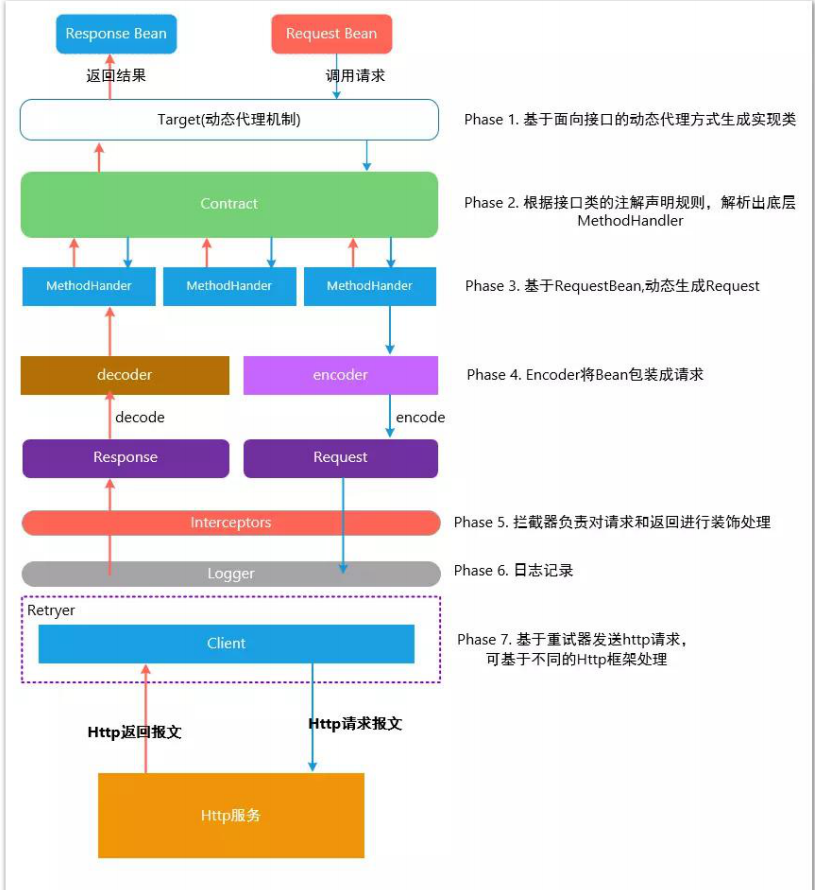
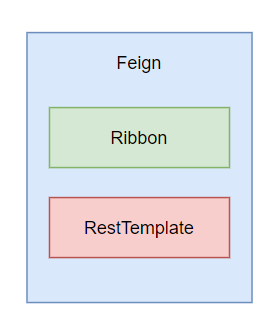
Feign集成了Ribbon、RestTemplate实现了负载均衡的执行Http调用,对原有的方式(Ribbon+RestTemplate)进行了封装
OpenFeign是springcloud在Feign的基础上支持了SpringMVC的注解,如@RequestMapping等等。OpenFeign的
@FeignClient可以解析SpringMVC的@RequestMapping注解下的接口,并通过动态代理的方式产生实现类,实
现类中做负载均衡并调用其他服务。
使用注意事项和总结
如何使用
<dependency>
    <groupId>org.springframework.cloud</groupId>
    <artifactId>spring-cloud-starter-openfeign</artifactId>
</dependency>@SpringBootApplication
@EnableDiscoveryClient
@EnableFeignClients
public class OpenFeignApplication {
public static void main(String[] args) {
SpringApplication.run(OpenFeignApplication.class, args);
}
}注意事项
openFeign传参问题
1.传递JSON数据
在Spring Boot 中通过@RequestBody标识入参。
注意:openFeign默认的传参方式就是JSON传参(@RequestBody),因此定义接口的时候可以不用@RequestBody注解标注,不过为了规范,一般都填上。
2.POJO表单传参
openFeign提供了一个注解@SpringQueryMap解决POJO表单传参。
3.URL中携带参数
针对restful方式中的GET请求,使用注解@PathVariable接收url中的占位符
4.普通表单参数
@FeignClient(value = "openFeign-provider")
public interface OpenFeignService {
    /**
     * 必须要@RequestParam注解标注,且value属性必须填上参数名
     * 方法参数名可以任意,但是@RequestParam注解中的value属性必须和provider中的参数名相同
     */
    @PostMapping("/openfeign/provider/test2")
    String test(@RequestParam("id") String arg1,@RequestParam("name") String arg2);
}
openFeign超时机制
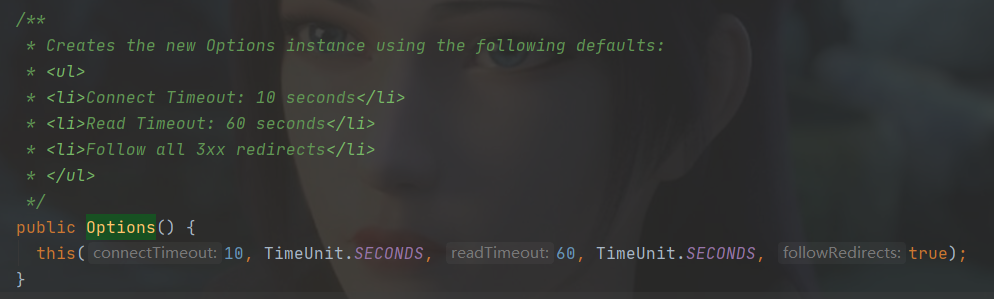
openFeign其实是有默认的超时时间的,默认分别是连接超时时间
10秒、读超时时间60秒``feign.Request.Options#Options()`
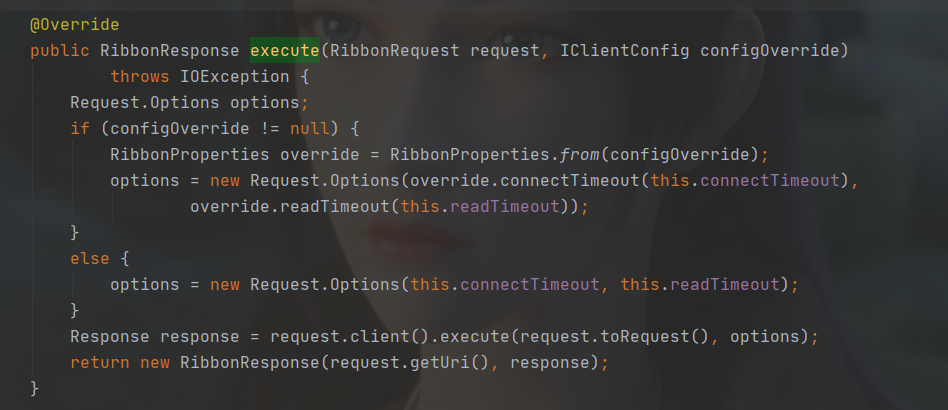
openFeign集成了Ribbon,Ribbon的默认超时连接时间、读超时时间都是是1秒
org.springframework.cloud.openfeign.ribbon.FeignLoadBalancer#execute
如果openFeign没有设置对应得超时时间,那么将会采用Ribbon的默认超时时间。
超时解决方案
- 设置openFeign的超时时间
- 设置Ribbon的超时时间
1.设置Ribbon的超时时间(不推荐)
ribbon:
# 值的是建立链接所用的时间,适用于网络状况正常的情况下, 两端链接所用的时间
ReadTimeout: 5000
# 指的是建立链接后从服务器读取可用资源所用的时间
ConectTimeout: 5000
2.设置openFeign的超时时间(推荐)
feign:
client:
  config:
    # default设置全局超时时间,指定服务名称可以设置单个服务的超时时间
    default:
      connectTimeout: 5000
      readTimeout: 5000
    # 为serviceXXX这个服务单独配置超时时间(单个配置的超时时间将会覆盖全局配置)
    serviceXXX:
      connectTimeout: 30000
      readTimeout: 30000
openFeign日志增强
openFeign的日志级别如下:
- NONE:默认的,不显示任何日志;
- BASIC:仅记录请求方法、URL、响应状态码及执行时间;
- HEADERS:除了BASIC中定义的信息之外,还有请求和响应的头信息;
- FULL:除了HEADERS中定义的信息之外,还有请求和响应的正文及元数据。
1.配置类中配置日志级别
javaimport feign.Logger; import org.springframework.context.annotation.Bean; import org.springframework.context.annotation.Configuration; @Configuration public class OpenFeignConfig { @Bean Logger.Level feignLoggerLevel() { return Logger.Level.FULL; } }
2.yaml文件中设置接口日志级别
yamllogging: level: cn.open.feign: debug #openFeign接口所在的包
openFeign替换httpclient
Feign在默认情况下使用的是JDK原生的URLConnection发送HTTP请求,没有连接池,但是对每个地址会保持一个长连接,即利用HTTP的persistence connection。
在生产环境中,通常不使用默认的http client,通常有如下两种选择:
- 使用ApacheHttpClient
- 使用OkHttp
使用ApacheHttpClient替换
1.添加依赖
在openFeign接口服务的pom文件添加如下依赖:
<!--使用Apache HttpClient替换Feign原生httpclient-->
<dependency>
    <groupId>org.apache.httpcomponents</groupId>
    <artifactId>httpclient</artifactId>
</dependency>

<dependency>
    <groupId>io.github.openfeign</groupId>
    <artifactId>feign-httpclient</artifactId>
    <version>9.3.1</version>
</dependency>为什么要添加上面的依赖呢?从源码中不难看出,请看org.springframework.cloud.openfeign.FeignAutoConfiguration.HttpClientFeignConfiguration
2.配置文件
feign:
  client:
    httpclient:
      # 开启 Http Client
      enabled: true
3.验证成功
在feign.SynchronousMethodHandler#executeAndDecode()这个方法中可以清楚的看出调用哪个client
使用OkHttp替换
1.添加依赖
<dependency>
    <groupId>io.github.openfeign</groupId>
    <artifactId>feign-okhttp</artifactId>
    <version>10.2.0</version>
</dependency>
2.配置文件
feign:
  okhttp:
    enabled: true
ribbon:
  okhttp:
    enabled: true
openFeign通讯优化
当GZIP压缩到一个纯文本数据时,效果是非常明显的,大约可以减少70%以上的数据大小。
网络数据经过压缩后实际上降低了网络传输的字节数,最明显的好处就是可以加快网页加载的速度。网页加载速度加快的好处不言而喻,除了节省流量,改善用户的浏览体验外,另一个潜在的好处是GZIP与搜索引擎的抓取工具有着更好的关系。例如 Google就可以通过直接读取GZIP文件来比普通手工抓取更快地检索网页。
GZIP压缩传输的原理如下图:
按照上图拆解出的步骤如下:
- 客户端向服务器请求头中带有:
Accept-Encoding:gzip,deflate字段,向服务器表示,客户端支持的压缩格式(gzip或者deflate),如果不发送该消息头,服务器是不会压缩的。- 服务端在收到请求之后,如果发现请求头中含有
Accept-Encoding字段,并且支持该类型的压缩,就对响应报文压缩之后返回给客户端,并且携带Content-Encoding:gzip消息头,表示响应报文是根据该格式压缩过的。- 客户端接收到响应之后,先判断是否有Content-Encoding消息头,如果有,按该格式解压报文。否则按正常报文处理。
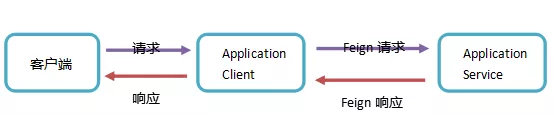
openFeign支持请求/响应开启GZIP压缩,整体的流程如下图:
上图中涉及到GZIP传输的只有两块,分别是Application client -> Application Service、 Application Service->Application client。
注意:openFeign支持的GZIP仅仅是在openFeign接口的请求和响应,即是openFeign消费者调用服务提供者的接口。

openFeign开启GZIP
feign:
  ## 开启压缩
  compression:
    request:
      enabled: true
      ## 开启压缩的阈值,单位字节,默认2048,即是2k,这里为了演示效果设置成10字节
      min-request-size: 10
      mime-types: text/xml,application/xml,application/json
    response:
      enabled: true
openFeign熔断降级
使用openFeign+Sentinel进行整合实现服务降级
1.添加Sentinel依赖
在消费者的pom文件添加sentinel依赖,如下:
<dependency>
      <groupId>com.alibaba.cloud</groupId>
      <artifactId>spring-cloud-starter-alibaba-sentinel</artifactId>
</dependency>
2.配置文件中开启sentinel熔断降级
要想openFeign使用sentinel的降级功能,还需要在配置文件中开启,添加如下配置:
feign:
  sentinel:
    enabled: true